How to Use and Pay for GitHub in Nigeria

Let’s paint a familiar picture.
You just finished writing the cleanest piece of code you’ve ever touched, a solid React frontend, connected to your Flask backend, all wrapped up neatly in Docker containers. You’re excited. You want to push it to GitHub, set up your CI/CD, maybe upgrade to Copilot for those sweet AI-assisted code suggestions. Then… payment wahala hits.
GitHub’s asking for a subscription upgrade.
You whip out your naira card. Declined.
You try another one. Still declined.
And just like that, your flow is broken.
If you’ve ever been here, you’re not alone. But before we go too deep, let’s step back for a sec.
So, What Exactly Is GitHub?
GitHub is like the home of the internet for developers.
Whether you’re building your first HTML page or managing a full-stack SaaS project, GitHub is where your code lives, breathes, collaborates, and evolves. Think of it as Google Drive, but specifically built for code, with powerful tools for version control, collaboration, issue tracking, automation, and so much more.
It’s based on Git, a version control system developed by Linus Torvalds (the same guy who built Linux). Git helps you track every change you make to your code, while GitHub gives you a place to host it, share it, and work on it with others, even across time zones.
Why Do People Pay for GitHub?
While GitHub’s free plan is great for starters, if you’re serious about your development work (especially for teams or open source collabs), you’ll eventually need to go premium. Here’s why:
GitHub Copilot: Think of it as ChatGPT for your VS Code. It suggests entire code blocks as you write, yes, entire functions. Absolute productivity booster.
Private Repositories for Teams: Want to keep that billion-dollar startup idea private while building it with friends? You’ll need a premium plan.
Advanced Permissions: Control who can do what with your code, from read-only access to full-on admin rights.
Security Features: Extra layer of protection like vulnerability alerts and secret scanning.
More Storage & CI/CD Minutes: Especially useful if you’re shipping fast and deploying often.
But Here's the Problem...
If you’re in Nigeria and want to pay for GitHub, GitHub Copilot, or upgrade your team plan, things get messy fast.
Local naira cards? Declined. Virtual cards from most banks? Not working. International dollar cards? Maybe… if you’re lucky.
And that’s where Myaza comes in.
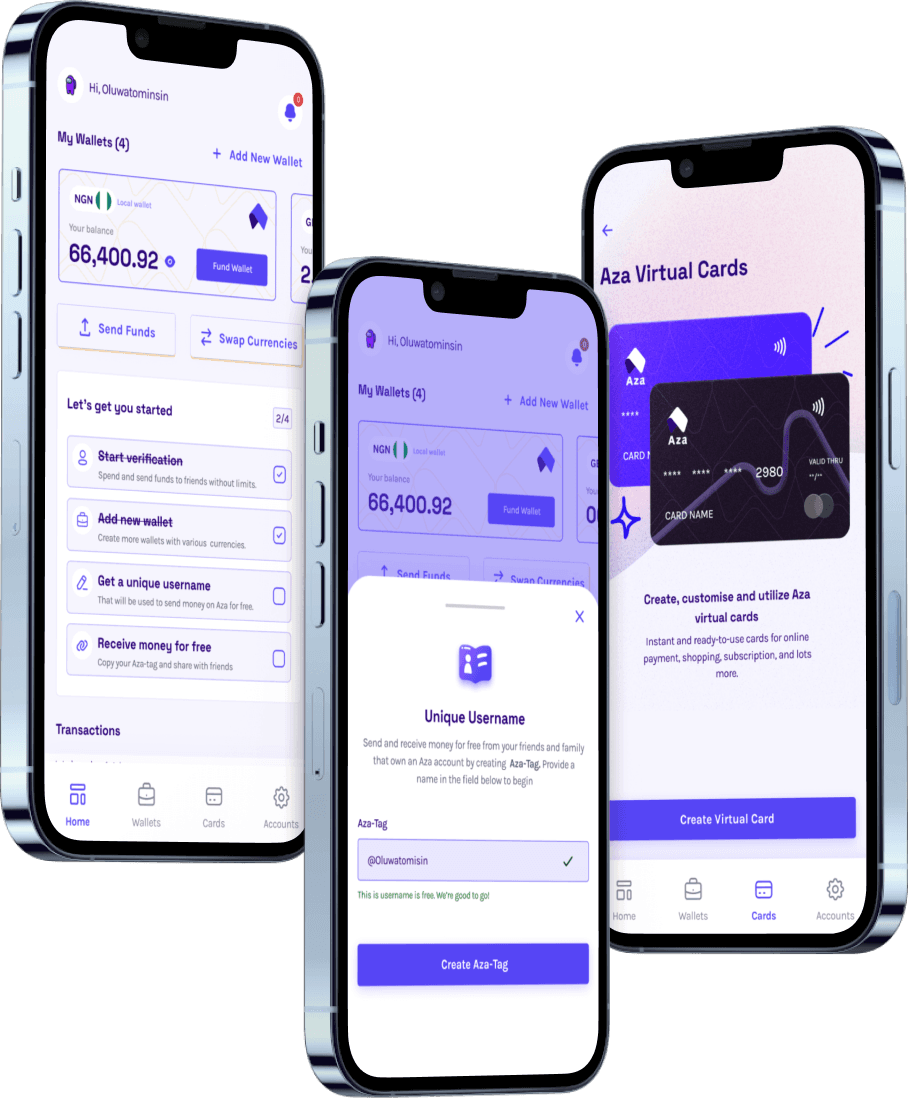
How to Pay for GitHub Services in Nigeria with Myaza
With Myaza, you can get a virtual USD card that works effortlessly for international subscriptions like GitHub, GitHub Copilot, and more.
Here’s how you can set up everything in a few simple steps:
Download the Myaza App: Available on iOS and Android.
Sign Up and Complete KYC: It takes just a few minutes. Upload your ID, take a selfie, done.
Fund Your USD Wallet: Choose to fund via USDT, USDC, or Naira bank transfer.
Get Your Virtual Dollar Card: It costs just $3 to generate.
Link Your Myaza Card on GitHub: Head to your GitHub billing settings and add the card.
Subscribe or Upgrade: Whether it’s Copilot, Team, or Enterprise, you’re good to go.
Who Is This For?
Developers who use GitHub Copilot every day and want to stop begging friends abroad for card help.
Remote tech workers who collaborate on repos and need premium GitHub access.
Startup teams building in public or privately and need scalable collaboration tools.
Students and junior devs learning to build serious projects and want to unlock more features.
Open Source contributors who want to level up and get noticed.
And There’s More…
With your Myaza virtual dollar card, you’re not just paying for GitHub. You can also:
Subscribe to tools like Figma, DigitalOcean, Vercel, Netlify, Notion, and more.
Receive payments from international clients in USD or crypto (via your wallet address).
Easily swap your received crypto to Naira.
Track all your subscriptions in one place.
In the End, It's Not Just About GitHub…
It’s about giving yourself the freedom to build, grow, and collaborate globally, without being limited by borders, broken payment systems, or card errors.
So whether you’re freelancing, coding for fun, running a dev team, or contributing to open source… it’s time to do it without friction.
Your next repo is waiting. And with Myaza, you’re finally equipped to push, pull, commit, and pay like a boss.